

Introduction: Raspberry Pi CNC Machine

My friend and I thought about building a CNC Machine for a while. But we didn't want it to be just an ordinary CNC Machine. We wanted to make a very unique machine that could have very unique attributes. We set out to make a CNC Machine that could do different types of Machining. For example, routing, laser engraving, 3D printing, drag knife, etc. We took about a few months to design the basics of the machine. For example, what kind of linear motion we would have for each axis, what kind of material we would use for it, what kind of style to make it, etc. We chose our build area to be 24" X 24" X 7". After those few months of finalizing everything, we took our first step into physically making the machine. Note: This is made for the average consumer, for home use, and for someone who doesn't have the money to invest in a $1000 CNC router or 3D printer.
Step 1: Materials/Construction

Our best bet for material, that would be most cost efficient, but most reliable, was Baltic Birch Plywood. Me and my teacher split (2) sheets of it. One sheet was 3/4 inch, and the other was 1/2 inch, this was plenty enough. We both payed $36 each, so it was around $72 for both sheets at Lenco Lumber. I also used cross dowels and 1/4 inch philips head bolts to bolt together the Gantry, and used 3/8 threaded rods you can get at The Home Depot. Plus a few miscellaneous parts that I can't think of. Everything came to about $250, this depends on how you make your machine. Also, I used angle aluminum and skate bearings for my rails and carriages, I got a hundred bearings on Ebay for $40, the more you buy the less cost per bearing is. You can find the angle aluminum at The Home Depot. I have recently added a parts list, cost and where to get everything.
Attachments

Step 2: Step 1: Gantry


The first step to building the machine was the Gantry, this is my first time building anything close to a CNC Machine, I found it best to start with the Gantry. You can use the exploded view to help you put everything together.

Step 3: Step 2: the Y-axis/Base


For the Base I used 2X4's and ripped a 1/4 inch off each side on the table saw to get them as flat as possible. Then I made a torsion board with them. I screwed a piece of MDF on it to make the base as level as possible. This will prevent inaccurate measurements during a machining process. You can use the animation to help you put everything together.
Attachments
Step 4: Step 3: X-axis/Z-axis

The X and Z axis is something you want to take your time on, because this is very important on whether your machine works or doesn't.. Also, I made the lower rail on the gantry for adjusting your X-axis because it can change over time. The exploded view should help you along.
Step 5: Step 4: Hardware
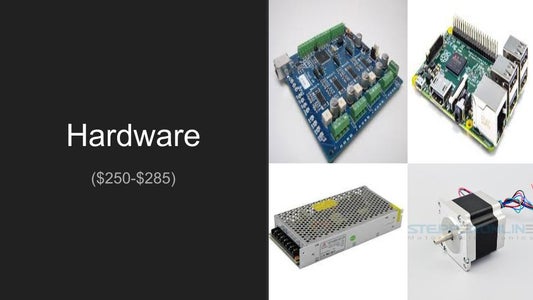
What we decided to go with in terms of the control board was the TinyG v8. It is very flexible with what it can do, as in the type of software,a and firmware, but I will get into that further in the next couple steps. For the TinyG, we needed a 24 volt power supply to power the 3 NEMA 23 stepper motors for each axis. I got all three stepper motors and three couplings for around $90 on StepperOnline.com. I got the TinyG on synthetos.com for $136 including tax and shipping.
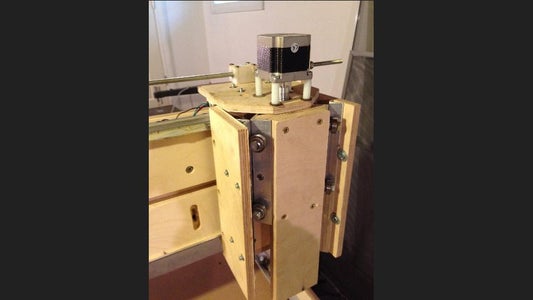
Step 6: Step 5: Attaching Electronics and Cart


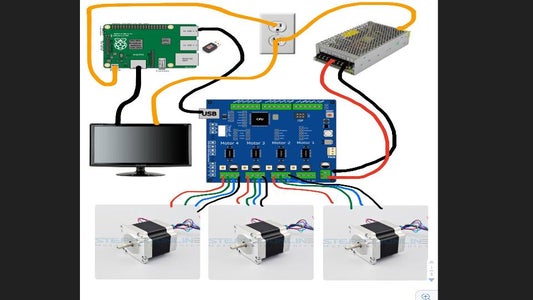
I attached each Motor to it's Axis, after making a couple mounts for the X-axis. All the Motors go to each stepper driver on the TinyG board. Also, make sure you check your stepper wire groups, because you can damage them if you do not have them on right. It is very helpful to organize your wiring, because it can be a pain in the but to figure out what goes where. You can motor map each motor to each Axis in the software, once you connected everything, so the board knows which Axis is which. This CNC Machine is very significant because we managed to run the machine using a credit card size computer, aka. the Raspberry Pi. You would connect the Raspberry Pi just like how you would connect it with any other computer. Also, in the last picture i mapped out how everything is connected to give you a better understanding of the electronics. Next we will talk about the software.
Step 7: Step 6: Software


The Software we chose that would be most suitable for the machine, was Chilipeppr. We chose this Software because it is very flexible with what you can do with the machine. It gives you a bunch of workspaces, for different boards you are using and other types of machining you can do. The workspace we chose was the tablet workspace, because the Raspberry pi is basically run by a phone processor. Since Chilipeppr is an api and it is a network based program, it has to be accessed though online. You also need to run a serial port for Chilipeppr so it can communicate to the TinyG via USB. Basically you download the serial port JSON server from the Chilipeppr website and you run it in terminal before you start up Chilipeppr on your machine, NOTE: The serial port JSON server has to be running the whole time while your machine is being used. Also, NOTE: That you cannot download the serial port JSON server through console, it will automatically unzip your file, therefore your serial port cannot be run, because you need the application. Once that has all gone through you can configure your TinyG board via CLI in Chilipeppr and you can go look at all of the configuring commands, and if you need help you can go to the TinyG wiki, and it will show you everything there has to do with the TinyG and Chilipeppr.
Step 8: Final Project So Far....


This is still a work in progress, what we are working on now is trying to 3D print with the machine and add other tools to machine with. The last picture in this slide is the second test of the machine, the first test is the Chilipeppr logo as seen in the software slide. The machine works very well, and there will be more to come. We will keep you posted, as more progress continues. Thanks for taking the time to value our project!

Runner Up in the
Robotics Contest 2016

Second Prize in the
First Time Author Contest 2016

Participated in the
3D Printing Contest 2016


