Fixing and cleaning the Razer Lachesis
A couple of days ago, my faithful Razer Lachesis of many years finally started to show its age.
The only problem I’ve ever had before now with the mouse was a loose mouse wheel grip which wasn’t creating enough friction to actually turn the mechanism itself. A careful application of some superglue fixed the problem – something to note though, I own the older version of the Lachesis, I believe this was a common problem fixed in the later models.
On Saturday, however, the proverbial fecal matter hit the fan.
In the space of a morning, the grip came loose again, the middle mouse click no longer registered, and the left click was alternating between not working at all or clicking several times every press.
My thoughts regarding Razer
Now, Razer is one of those brands that’s either loved or hated. The common complaint I hear is that they slap a high price on a piece of gear just because it has pretty lights and lots of buttons.
Yes, they hype the living crap out of their products, with many claims of “The world’s first -insert product here-!” and phrases such as “Hold infinity in the palm of your hand”.
If their marketing is to be believed, then a Razer mouse and keyboard will make you the BEST at EVERYTHING EVER FOREVER, and everything around you shall erupt into flames as you game due to the sheer magnitude of the hyper-condensed awesome in the room.
After using the Lachesis for a while, I can say with certainty that I don’t win everything by default, nor has anything caught fire.
Well, nothing of note anyway.
The reason Razer mice are loved by their users comes down to a few good combinations of features. First of all, they’re exceptionally comfortable, most notably during extended use. This, combined with good ergonomic button layout, means you can make use of all features on the mouse without reaching far for the more obscure buttons. The second combination lies in the high precision sensors – when used with a comfortable mouse that’s easy to manipulate, the mouse can allow you to achieve some excellent precision.
Reasons a Razer is bad? First one that comes to mind is the durability of the microswitches used. I know two other people who own Razer mice, and both have eventually had minor problems with the buttons (one was fixable with a clean, the other was not). Second reason, you’re branded as a Razer user. You get that look of “oh, you’re one of those” every time you game with people.
I don’t care so much about the second point – before I owned a Razer I already had a Z-Board Fang, so I’m kind of used to that reception. As to the first point, that’s what I’ll be covering in the following tutorial, so enough with my rambling.
How to pull apart and clean a Razer Lachesis.
You’ll probably notice I took these photos as I was putting the mouse back together. Originally it was… somewhat less clean than in these photos.
First of all, you’ll need a few things:
- Small screwdriver
- Methylated spirits
- Compressed air
- Sealable container big enough to fit the mouse
- A sink and some dishwashing liquid
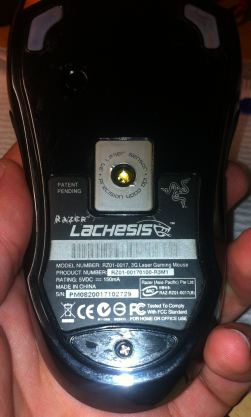
So, starting at the bottom of the mouse, carefully remove the rear pad – The glue stays good enough to re-attach it to the mouse when you’re done, so try not to damage it.
Using a small screwdriver, take out the screw under the pad – There’s only two screws holding this whole mouse together, the rest is just plastic tabs.
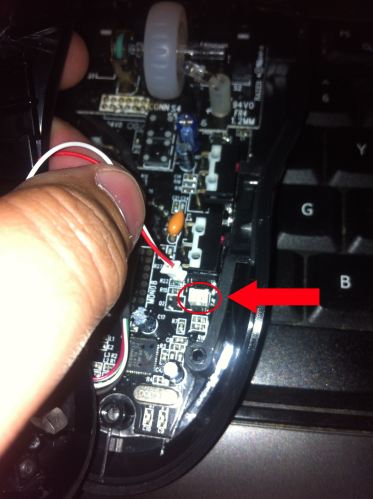
At this point you can gently take the upper and lower parts of the mouse apart – There’s a cable running to a LED up the top, so don’t yank the pieces apart or you might damage something.
Disconnect the LED’s wire by gently pulling it from the socket on the main board.
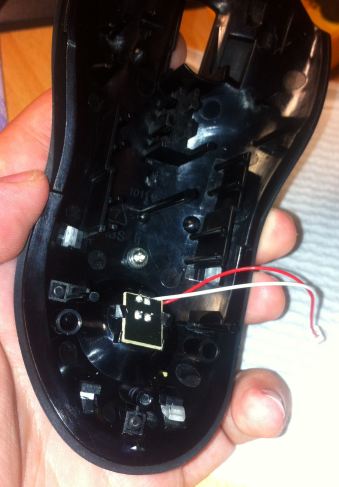
The LED is held in place by a few plastic tabs, un-clip it from these to take it out.
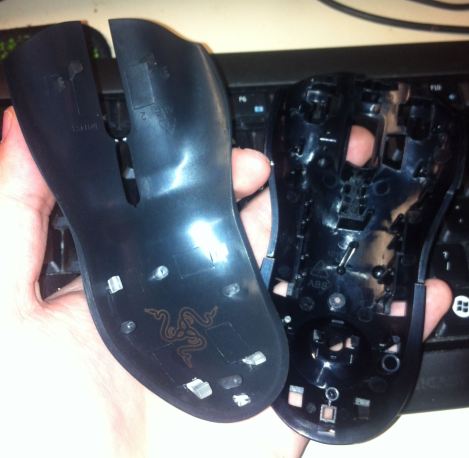
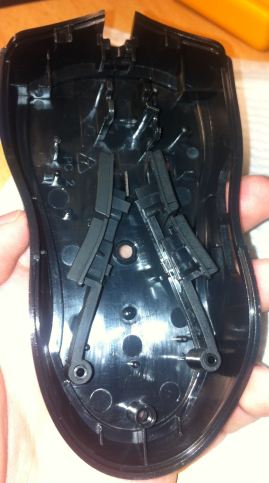
By removing the final screw just in front of the LED mounting, you can then separate the two top components by carefully unclipping the rear from the four tabs, then sliding the inner piece past the tabs at the front. As you might notice in the photo, I wasn’t careful enough while prying the tabs off, and snapped one – It doesn’t affect the mouse at all when it’s back together.
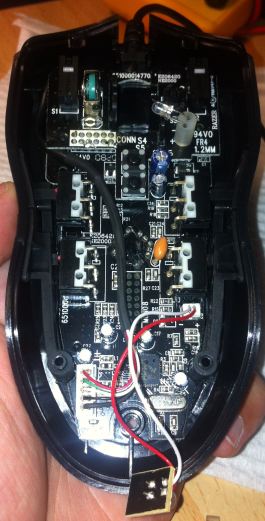
Now that the top has been disassembled, you can move to taking the main board out of the shell. Slide the USB cable from its mounting at the very front of the mouse, then very carefully pull the main circuit board out of the shell.
Once the circuit board is removed, you can take out the side buttons by pushing them in from the outside, rotating them inwards, then lifting them from their mountings.
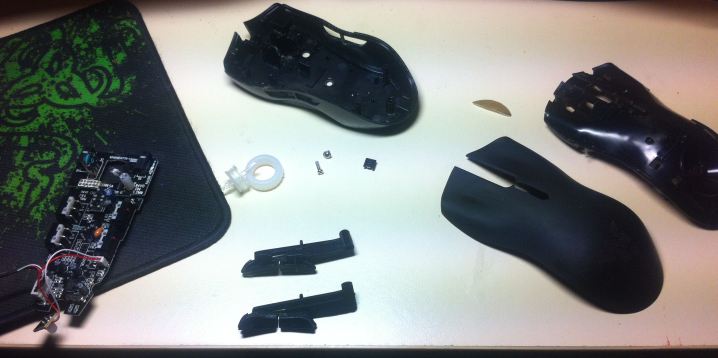
Once this is done, remove the small free-floating profile selector button from the base of the mouse. You also may want to remove the rubber grip from the mouse wheel if you want to re-secure it.
And that’s it, the mouse is disassembled.
Now that the electronics are separated from the plastic components, get some hot soapy water and dunk the plastic components in. Let them soak for a bit, then using an old toothbrush or something of the sort, scrub away at the plastic especially where all the dead skin and various other mysterious gunk is accumulated. Be careful when scrubbing at the bits with the rubber coating – this can wear away if placed under too much pressure.
Once everything is clean, you’ll need some methylated spirits to wash over the circuitry. Place some in a sealed container – enough to roughly cover the circuit board – and give it a shake around to make sure nowhere on the board is missed. With your source of compressed air handy, take the circuit board out of the methylated spirits, give it a second to drip dry, then give it a good spray with the compressed air especially over the microswitches. Once the board is blown dry with the compressed air, and any visible gunk has been removed, you’re basically done.
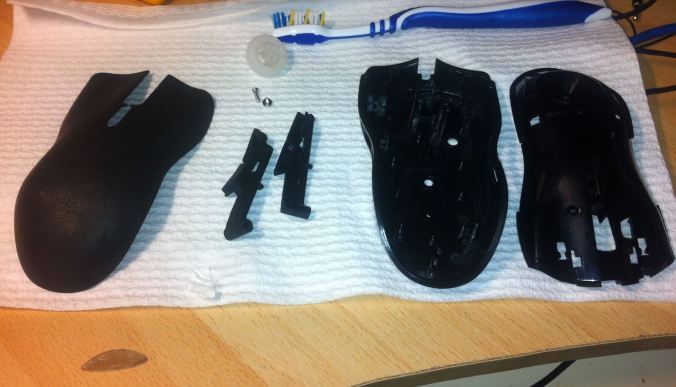 At this point you can superglue the mouse wheel grip more securely to the wheel – just make sure to give it enough time to cure before trying to reassemble. Obviously, to reassemble the mouse, just follow the above steps in reverse. The only thing to keep in mind is that when trying to re-seat the circuit board, it takes some convincing to get it properly seated all the way down. The easiest way to tell if it’s seated is to place the mouse wheel back into its mechanism.
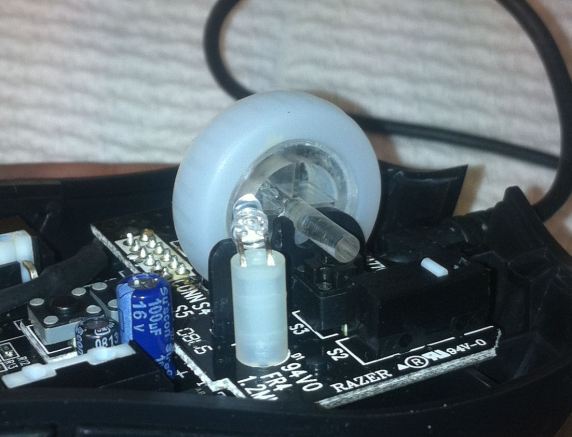 As you can see here, the wheel is not quite set into its mount – the board must be carefully pushed down a bit further.
Once I had cleaned and re-assembled the mouse, all except the middle mouse button was fixed, much to my disappointment. With the inspection of a multimeter (which I probably should have done first honestly) I found that the microswitch itself was indeed dead. However, with a quick search on Ebay for “Square micro switch for mouse” I managed to score myself a few replacements. Although apparently manufactured by Panasonic, i’m sure that these will work exactly the same.
I’ll post again with results once I receive the components.
And with that, I’ll say adios!


where can you get a topcover replacement?
Thank u so much!! I did everything like u said and it worked out perfectly! I have Lachesis for nearly 10 years and I’ve never cleaned it!! 😀 Now it feels like brand new mouse! So cool!
Thank you, I did everything as explained and it turned out perfectly. I feel like i just bought my lachesis yesterday.